
If press-ons never seem to cover your sides, pop off at the corners, or feel tight within hours, you may need press-on nails for wide nail beds rather than a standard fit. The problem is not your nails. The problem is usually sizing, sidewall coverage, or curve mismatch.
With the right measuring method and a few small fit tweaks, press-on nails can look seamless, feel comfortable, and last far longer than a weekend. This guide walks you through how to measure, choose, apply, and maintain the best press-on nails for wide nail beds without guesswork or wasted sets.
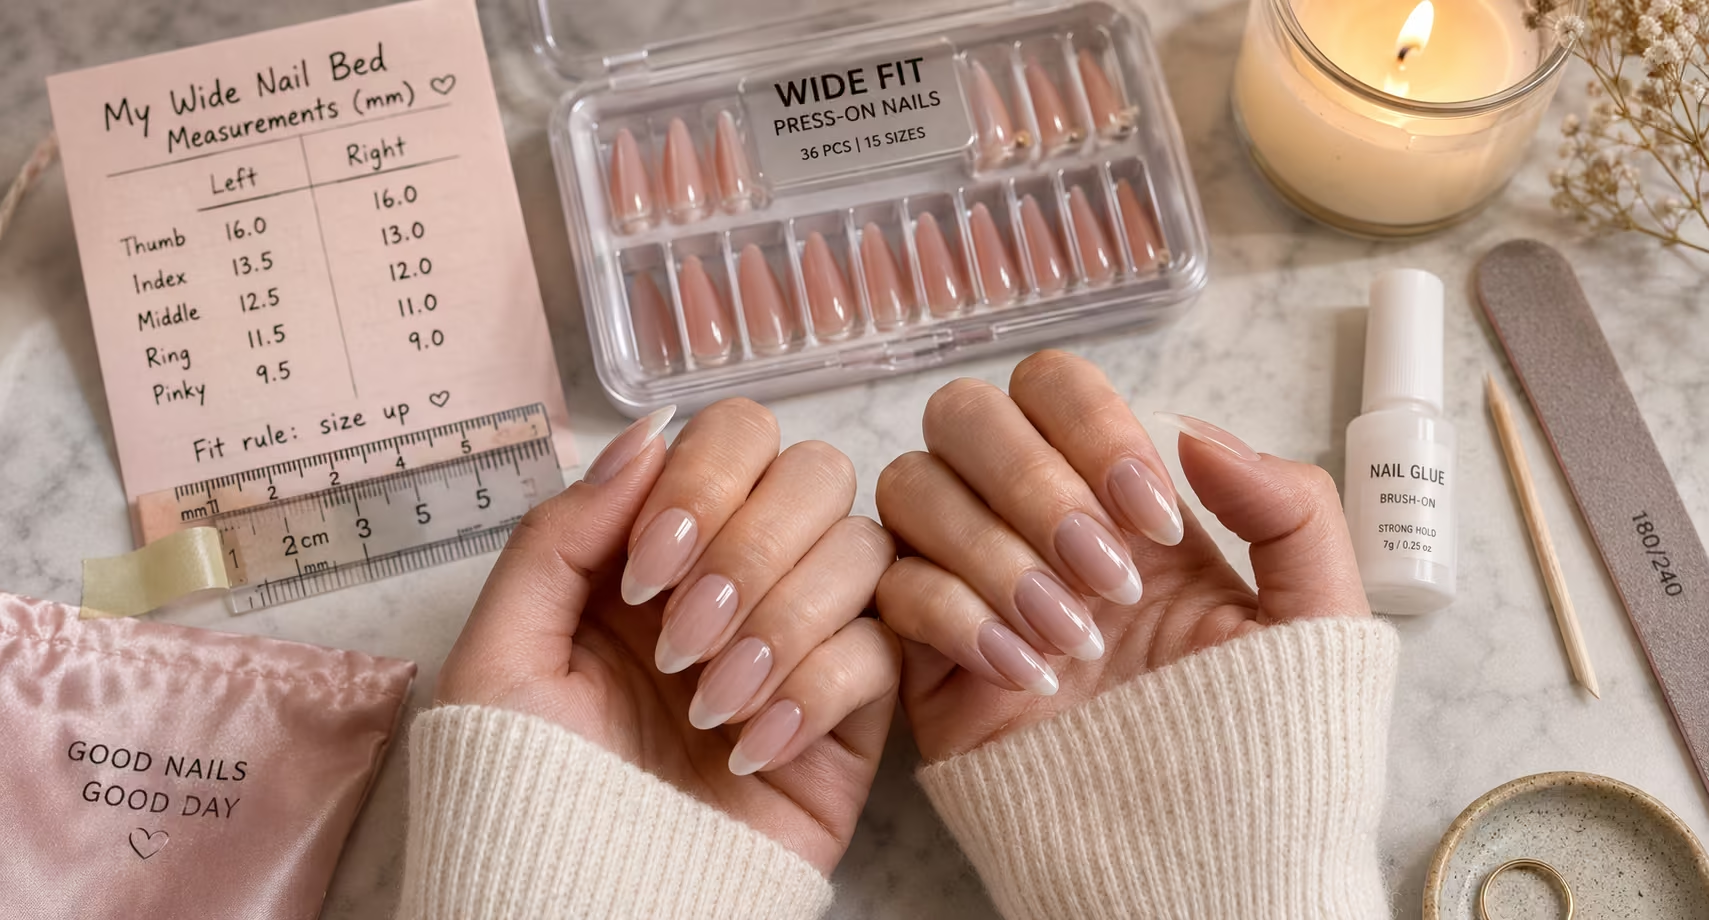
Quick answer: The best press-on nails for wide nail beds have a generous size range, flexible material, a moderate C-curve, and enough sidewall coverage without touching skin. Measure each nail in millimeters, size up when between sizes, file the press-on sidewalls to fit, and press firmly along the sides to prevent corner lift.
What Are Wide Nail Beds and Why Press-Ons Fail
Wide nail beds are simply nails whose width is more generous, especially at the sidewalls, relative to their length. Most press-on kits are designed for average widths, which can leave two common issues:
- Sidewall exposure: The press-on doesn’t fully cover the edges, so glue ends up on skin and the nail lifts early.
- Pinching and pressure: A deep C-curve or narrow base squeezes your natural nail; it may look okay at first but becomes uncomfortable and eventually pops.
To keep your manicure feeling natural, your press-on should sit flush along the sidewalls with zero overlap onto skin and without arching or “tenting.” That happens when you choose sets with the right width options and a flexible, not overly deep, curve.
How to Measure Wide Nail Beds for Press-Ons
Skip the “hold up a nail and hope” routine. A quick measurement gives you repeatable, perfect fits.
- Create a sizing strip
Cut a thin strip of painter’s tape or paper. Place it across the widest part of your natural nail. Mark where your nail starts and ends, then move the strip to a ruler to read the width in millimeters. - Measure all ten nails
Record widths for each finger on both hands. Many people have different sizes from left to right. - Decide your “fit rule”
For wide beds, size up rather than down. It’s easier to file a press-on a hair narrower than to force a too-small nail to cover sidewalls. - Map to size numbers
Different brands use different number systems. When shopping online, compare your millimeter widths to the size chart on the product page. If a chart isn’t listed, look for “wide-fit” or “universal-fit” notes and the count of sizes included per kit.
Jot your ten widths on your phone’s Notes app. That one habit saves time and returns, and helps you choose future sets in seconds.
What to Look for in Press-On Nails for Wide Nail Beds
You don’t need a “specialty” brand if you know what to scan for on any product page. Prioritize these traits:
- Wider size range per kit: Look for kits offering at least 28–36 pieces with sizes 0 through 14, ideally with half-sizes and duplicates of larger numbers. This increases the chance your sidewalls are fully covered, especially on thumbs and index fingers.
- Flexible soft-gel or similar materials: Slight flex helps the press-on hug your natural nail instead of pinching it. Rigid, high-arch nails can “tent” and lift at the corners on wide beds.
- Moderate C-curve and natural apex: A less dramatic curve prevents pressure and leaves fewer gaps to fill, improving comfort and longevity.
- Ample base width at the cuticle: The base should span your sidewalls without sitting on skin. If product photos show a very tapered, narrow base, proceed with caution.
- Finish you can file: Choose nails you can safely shape at the sidewalls and free edge with a fine-grit file. That tiny bit of customization is your best friend for a flush, natural fit.
- Clear size chart and return policy: If a brand posts exact millimeter widths and allows exchanges on unopened kits, it’s a strong sign they understand fit.
You might explore sets labeled “natural,” “wide-fit,” or “universal” and those that advertise more than the standard 24 pieces, as they tend to be kinder to wider nails.
Shapes and Lengths for Wide Nail Beds
A great fit starts with coverage, but shape and length influence how your hands look and feel.
- Almond press-on nails visually elongate wider nail beds because the softer taper draws the eye vertically without sacrificing sidewall coverage.
- Soft square or squoval balances width: If you love square, opt for softened corners rather than perfectly straight edges, which can exaggerate width.
- Medium length beats ultra-short for many: Extremely short tips can make wide nails look even wider. Try a short-to-medium length you can tailor with a file.
- French and vertical details help: Thin French lines, vertical accents, or tonal ombré make nails appear longer. Heavy horizontal lines can read wider.
When in doubt, test one finger with two shapes before committing to a full set. The difference can be huge on wide beds.
The Size Once, Wear Forever Method
Turn one kit into your custom library.
- Dry-fit first
Lay out potential sizes for both hands and try each press-on without glue. It should cover sidewalls fully without touching skin. If it’s close, choose the slightly wider option. - Micro-file the sidewalls
If a nail is a touch too wide, lightly file the sidewalls at a shallow angle, checking every few strokes; this same fit-first approach also helps make press-on nails look real. Instead of forcing width at the cuticle, sculpt the sides to mirror your natural outline. - Record final numbers
Write down the size numbers you settled on for each finger. Tape that “fit card” inside your storage box or save it on your phone. Many readers find they reuse the same numbers across multiple collections. - Let width decide; shorten later
Pick for width and comfort first. Length is easy to shorten after application with clippers and a fine file.
Adhesive Strategy for Wide Nail Beds and Corner Lift
Because wide nails have more lateral real estate, sidewall adhesion matters just as much as center bond.
- Prep like a pro: Wash hands, push back cuticles, lightly buff the nail plate, and wipe with alcohol to remove oils. A dehydrated surface is essential for sidewall grip.
- Use glue for long wear, tabs for short events: Adhesive tabs are convenient but often lift sooner along the sides. For multi-day wear, a brush-on or tube glue usually wins.
- Thin, even application: Apply a thin coat of glue to your natural nail and a small bead into the well of the press-on, especially near the sidewalls, but avoid flooding the cuticle.
- Apply at a slight angle: Seat the cuticle end first, then roll forward to the tip to push out air. Hold firm pressure for 30–45 seconds, focusing on the sidewalls.
- No water window: Keep nails dry and avoid lotions for at least an hour after application. If you can, install before bed so bonds cure undisturbed overnight.
Optional extra: After application, seal the edges with a swipe of clear top coat along the sidewalls to minimize micro-lifting and hair snags.
If corner lift has haunted you, try a firm press along each sidewall during the hold, set a 45-second timer and don’t rush it. That one habit significantly improves retention on wide nails.
Troubleshooting Wide Nail Bed Press-On Problems
- A corner started lifting: Slide a tiny amount of glue under the lifted edge with a toothpick, press and hold 30 seconds, then avoid water for an hour.
- Pressure or pinching: Remove that nail immediately, pressure points can cause soreness. Refit with the next width up and gently file the sidewalls to match your cuticle line.
- Glue squeeze-out: Wipe away excess right away with a dry cotton swab. If cured, gently buff and finish with cuticle oil to soften the look.
- Uneven tips: After the set cures, trim and file tips together so both hands match. Width first, then length and symmetry.
Safe Removal and Reuse for Wide Nail Beds
Wide nail beds can be more sensitive to aggressive removal because there’s often more surface contact. Go slow so you can reuse your favorites.
- Soften the bond: Soak fingertips in warm, soapy water with a little cuticle oil for 10–15 minutes. Wiggle gently at the sides; never rip off.
- Work from the sidewalls: Use a wooden stick to ease around edges. If you feel resistance, soak again. Patience prevents peeling layers of your natural nail.
- Clean for next time: Peel remaining glue from the underside of the press-on and lightly buff away residue. Store in labeled bags by size so you can rebuild a perfect set later.
How to Read Size Charts Before Buying Press-Ons
Before you click “add to cart,” scan the details through a wide-nail lens.
- Count of sizes and duplicates: More sizes and duplicates of larger tips mean better odds for thumbs and index fingers.
- Millimeter widths listed: Match your recorded widths to the brand’s chart, starting with thumbs. If your thumb width is close to their largest size, consider a wide-fit line or an extra-large kit.
- Shape notes: “Natural,” “soft square,” and “oval/almond” usually indicate friendlier base widths and curves than sharply tapered styles.
- Material description: Terms like “soft-gel,” “flex,” or “natural curve” are promising for sidewall contact without pinching.
- Sizing kits or sample packs: If you’re between widths, consider ordering a low-cost sizing kit first. It’s cheaper than buying full sets that don’t fit.
Complete Wide-Nail Application Routine
Here’s a smooth, start-to-finish process you can repeat for every set:
Wash and dry hands. Push back cuticles. Shape your natural nails short enough that the press-on can cap the free edge. Lightly buff and cleanse with alcohol. Dry-fit and pre-file sidewalls as needed. Apply thin glue to your nail and a small bead in the press-on well. Seat at the cuticle, roll forward, and press for 30–45 seconds with extra focus on the sidewalls. Repeat pinky to thumb. Avoid water for at least an hour; overnight is ideal. Finish by filing tips to match and sealing edges with clear top coat.
Conclusion: Width First, Then Shape and Length
Wide nail beds aren’t a barrier to beautiful press-ons, fit is. Measure each nail’s width in millimeters, choose kits with generous size ranges and flexible materials, and always size up then micro-file the sidewalls for a flush line at the cuticle. Apply thin, even glue to both surfaces, seat at a slight angle to push out air, and hold firm pressure along the sidewalls for 30–45 seconds. Keep them dry for an hour, fix small lifts right away, and remove with a warm oil soak so you can reuse your favorites. Do this once, save your size map, and every future set will feel custom.


